Following on from my previous post, where I got my setup in place, I started to make my first colour silver gelatin print. For this first print I’m using Crystal Archive Glossy, Medium Contrast, Resin Coated paper. In B&W printing you need to determine the correct filter grade and the correct timing for the print. This is pretty much the same for colour printing, but there are three colour filters that can be adjusted. The basic steps to getting a colour print are:
- Make an exposure test
- Make a filter test
- Make a final print
Sounds simple right? Yes and no. Let me explain.
Making the Exposure (Timing) Test
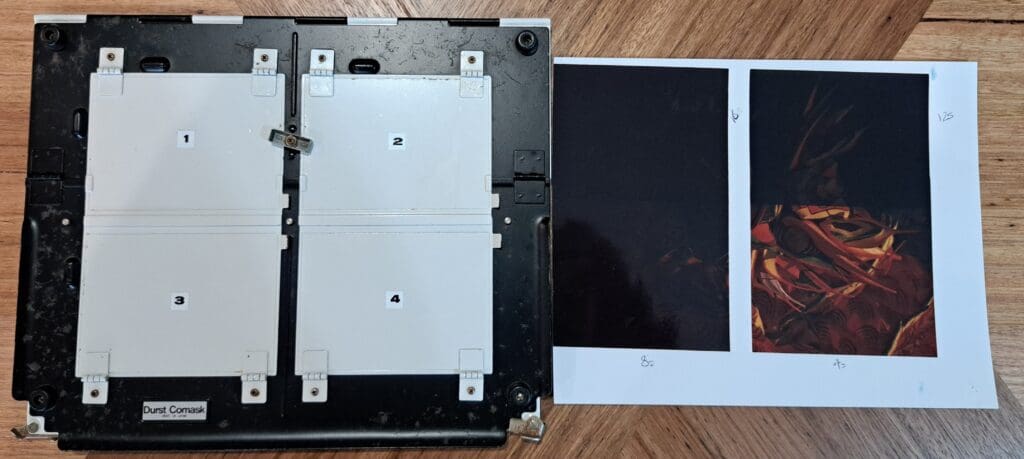
The first step is to determine the base timing to get a print with the right amount of density. This is basically the same as a test strip with B&W printing. My enlarger has a colour mixing head, so the filters are set using dials. Some enlargers use filter packs (similar to B&W filter packs). The three filter settings are Yellow, Magenta and Cyan, these are recorded as YMC when making notes. For the test exposure the three filters are all set to 0, or —. I made my exposure test with my Durst Comask easel that is divided into four sections that can be opened individually. According to everything I had read, the timing test should be done over the same section of the image, but I couldn’t figure out how to move the easel in the dark into the correct position each time. Instead, I positioned the image so that similiar colours and densities would be exposed in each section. Keep in mind that the test print and final print should be done at the same enlargement size, otherwise you may need to recalculate the exposure time.
Place the negative into the enlarger and compose the image on the easel. This is best done with the lens fully open, just don’t forget to stop it down before doing the exposure. I also use Blu Tak to keep the easel in place. Set the timer – I used 4 second intervals for this first test. Now you’re ready to go. Turn off the lights, remove the paper from it’s box and make the four exposures. My timer is impossible to reset in the dark, so using 4 x 4s intervals means I press it once for 4s, twice for 8s, three times for 12s and four times for 16s, swapping to a different quadrant of the Comask for each exposure. The paper now goes in the print drum and the lights can be turned on. Phew!
This test print is then developed (see below) and needs to be thoroughly dried before proceeding to the next step. It also needs to be examined in daylight (or with a daylight light source), so printing at night isn’t ideal. I hang my prints to dry and then set up the tank and chemicals ready for the next print. By the time I’ve done this, the print is pretty close to dry. If it’s a warm day I’ll take it outside and wave it in the air to finish drying, or on a cold day hold it over a heating vent with the print side up. I’ve also used a hairdryer on the back of the print. I make notes on the back of the print once its dry, so I can go back and check my steps later.
I examined the dried print in sunlight and selected a time where the density looked correct. If none of them looked right, I’d repeat the test with different exposure times. In this case 4 seconds looked about right. I probably could have tested again with 1s and 2s increments either side of 4s.
Making the filter test (getting the colours right)
The first test print has a very strong magenta cast, so I need to select filter values that will remove that cast. The Durst book on colour printing has seven “vital filtering rules” to use at this step:
- A colour cast in a test exposure is neutralised by the filter of the same colour. Yellow filters neutralise yellow casts, magenta filters neutralise magenta casts, and cyan filters neutralise cyan casts.
- All colours not contained in a filter set are produced by a filter combination of two different colours. Yellow + magenta = red and neutralises a red cast. Magenta + cyan = blue and neutralises a blue cast. Cyan + yellow = green and neutralises a green cast.
- Always use only one or two – never three – filter colours. Using a third filter colour neutralises the effect of the other two filters and essentially creates a neutral grey.
- Pale colour casts need low-density filters, strong colour casts need high-density filters. Excessive filter correction, i.e. compensating a slight colour cast with too heavy a filter, will create a print with the opposite cast. Excess yellow filtering creates a blue cast. Excess magenta filtering creates a green cast. Excess cyan filtering creates a red cast. The Durst M601 can set filter values from 0 to 100. Filter packs come with a number of filters at varying densities for each colour.
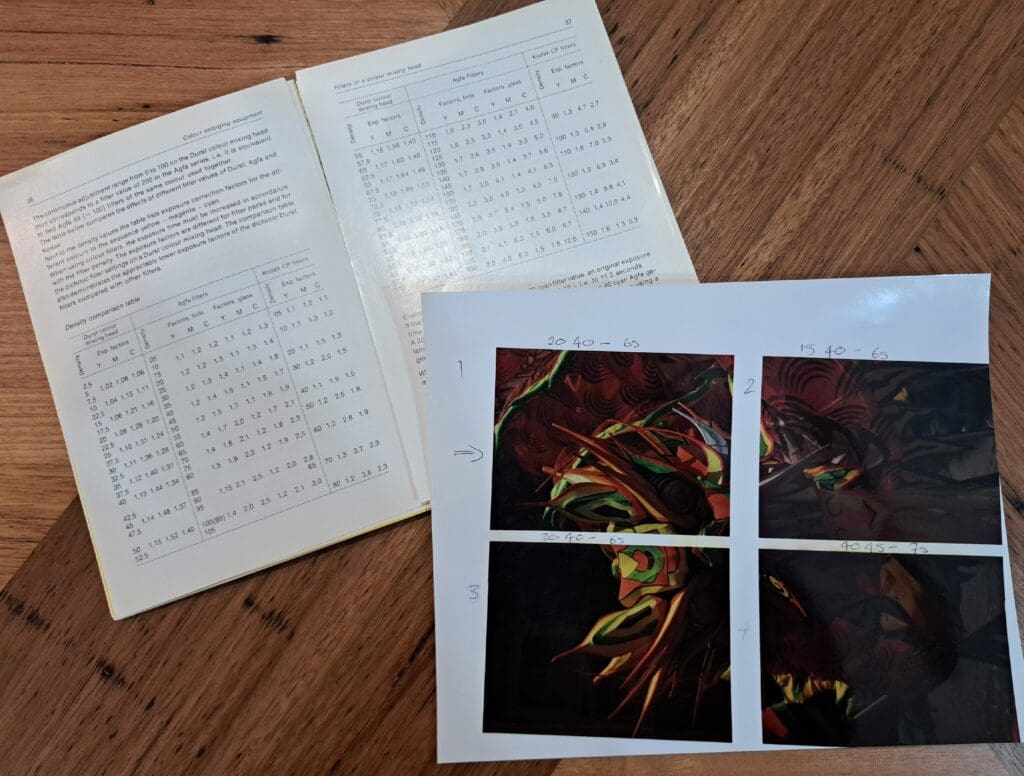
- Filters increase the exposure time; the denser the filter the greater the increase. Every filter setting holds back a certain amount of light. The Durst manual comes with a table of filter factors for each filter setting. Some maths is required here (see below). The same applies when using enlargers that require colour filter packs, there should be a list of corresponding filter factors.
- Always record the filter values on the back of every test and full enlargement print. Always use the sequence yellow/magenta/cyan, i.e. 20 30 -.
- Judge the colour rendering of the filter test by daylight. Always look at test exposures in daylight or with daylight-quality lighting. With experience you’ll be able to estimate the filter correction on a wet test.
For this test I will also use the Comask and test four differnt combinations of filter values: 20 40 -, 15 40 -, 30 40 -, and 40 45 -. I chose these values so that I could assess the level of colour cast with different levels of filtration. My starting point was really just a guess. Now to calculate the change to exposure time, for each of the four tests. The formula is:
Time (new) = Time (old) x [(F1 x F2 x F3)New / (F1 x F2 x F3)Old] (F = filter factor, 1/2/3 for Y/M/C)
When the filter value is 0 (zero) the filter factor is 1. For the timing test I used —, which has a filter factor of 1 x 1 x 1 = 1 (old filter factor).
For filter test 20 40 – , my new filter factors are 1.08 x 1.44 x 1 = 1.55. My new exposure time is 4s x 1.55/1 = 6.2 (6 seconds). Repeating this process for the remaining three tests I end up with:
| Filter Test | Yellow filter factor | Magenta filter factor | Cyan filter factor | New Filter factor | Exposure Time |
| 20 40 – | 1.08 | 1.44 | 1 | 1.55 | 6s |
| 15 40 – | 1.06 | 1.44 | 1 | 1.53 | 6s |
| 30 40 – | 1.11 | 1.44 | 1 | 1.59 | 6s |
| 40 45 – | 1.13 | 1.48 | 1 | 1.67 | 7s |
The first three of these tests are all at 6 seconds, which is quite easy to do. The problem is the 7s exposure, and changing my timer in the dark. I also need to change the filter factor on the Durst before each exposure. These are lit up when the enlarger is turned on, but are invisible in the dark. The Comask is supposed to block light when closed, but my first try using just the enlarger turned on resulted in two problems – the filtered light from the enlarger was not enough to see the timer (changing filter factors was fine), and when I briefly turned on a torch to see the timer I got light leaks through the Comask. For my second attempt, I turned my desk lamp on to see the timer, but placed a black card then a heavy box over the Comask – no light leaks!
Now it’s time for lights out, paper in the enlarger, four exposures (stopping to change the filter factor for each one, and the timer to 7s for the fourth), paper into the drum, and lights back on. Develop and dry the print, then evaluate the colour. In this case I decided that exposure 1 (20 40 -) was pretty good and proceeded to step 3. If I wasn’t happy with any of the prints, I would repeat the test by selecting the closest filter combination, determine what the colour casts were and make adjustments to the filter values from there, remembering to recalculate the exposure time.
Making a final print
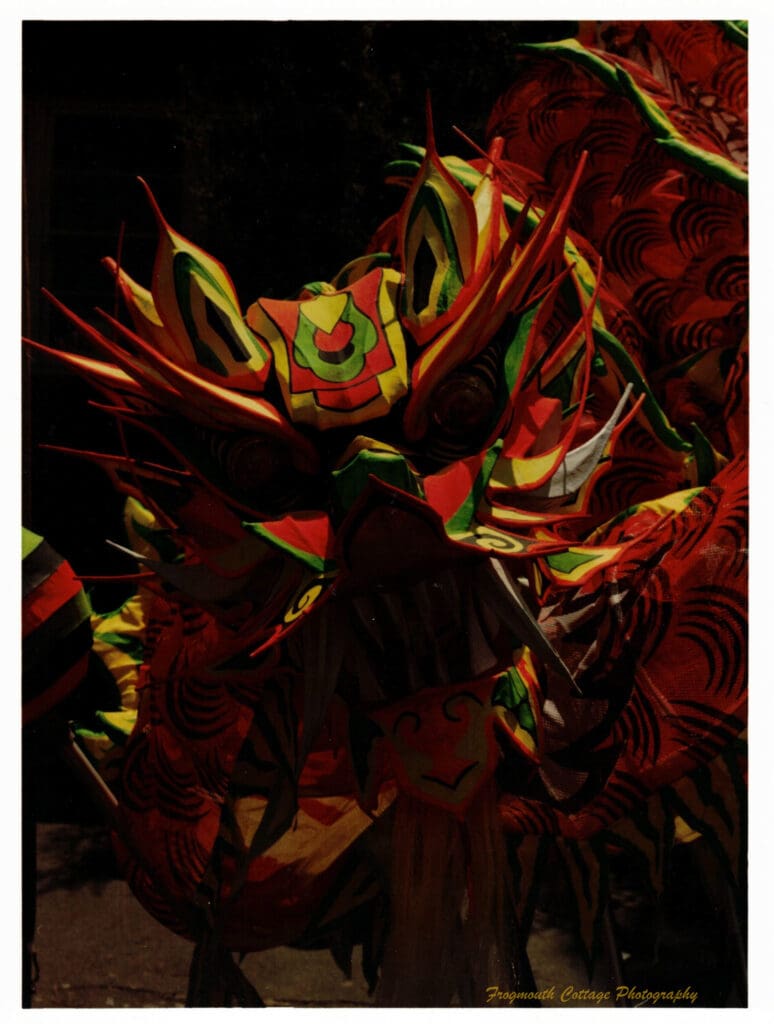
My final print was made using 20 40 – and 6 seconds on a regular easel. I kept the size of the main subject the same as the test prints, but needed to recompose the crop and positioning to fit the easel. The lens aperture stays at f11, but here is another problem. With the filters set, even with the lens fully open, it is difficult to see the image on the easel. The image needs to be composed and focussed with the filters at —, and then the filters and lens aperture set. I have produced a few black pieces of paper by forgetting to do this!
Repeating lights out, exposure, lights on and development resulted in the image below. It could probably do with a bit more refining, but good enough for a first go. The next time I print a Kodak Vision 3 negative, I can use 20 40 – as my starting filters. I should have tested exposure times below 4s and/or changed the lens aperture to f8, as this print is quite dark, especially when compared to the scan, but I’m happy with the colours. This will be a good print to revisit and also try some dodging and burning on.
Developing workflow
I modified my development workflow a bit during the above prints. Initially I followed some advice from Facebook groups about pre-rinsing and rinsing between dev and blix. But this just resulted in a lot of water splashing everywhere, so I went back to the instructions as per the Belini Kit, which don’t specify rinsing. I also switched from doing the wash in running water (again, very messy) to filling the drum four times with 500ml of water and rotating for 30 seconds each time. Wearing cotton gloves when handling the dry paper, and only touching the edges when wet, is also necessary as the paper is very susceptible to finger prints.
This is what my final development workflow looks like:
- Set up the Thermo-drum water bath and fill the three plastic bottles with the Developer, Blix and Stabiliser from the Bellini stock solutions. Place in the water bath.
- Fill a 2 litre jug with room temperature water and set aside. This is for the wash step.
- Get the water bath to temperature just above 35C.
- Expose the image (test or final print) and place in the drum.
- Place the drum into the water bath and check that it hasn’t dropped below 35C, if it has top up with hot water to 35C.
- Decant the chemicals from the bottles to the measuring cups.
- Pour the developer into the drum and and immediately start rotating it. After 30 seconds pour the developer out into a jug with a wide mouth (I use a 1 litre measuring jug).
- 45 seconds after pouring in the developer (15 seconds after starting to pour it out), pour the Blix into the drum and immediately start rotating it. After 45 seconds pour out the blix into a second jug.
- Pour 500ml of wash water into the drum and rotate for 30 seconds then discard the water into the sink. Repeat another three times until all the wash water has been used.
- Pour in the stabiliser and immediately start rotating the drum. Keep rotating for 2- 3 minutes. I do 2 minutes for a test print and 3 minutes for a final print. Pour out the stabiliser into a third jug.
- Remove the print from the drum and hang it up to dry.
- Pour the chemicals from the jugs back into their respective plastic bottles, and rinse and dry the drum. Put it back next to the enlarger for the next print.
- When the print is dry, check it and record the details of the print on the back of the paper.
- Repeat the process with the next test print or necessary changes.
I also keep a running tally of how many sheets of paper I’ve used so that I know when to replace my chemicals.
Now that I’ve got my workflow in place, it’s time to try different things and see what happens.